
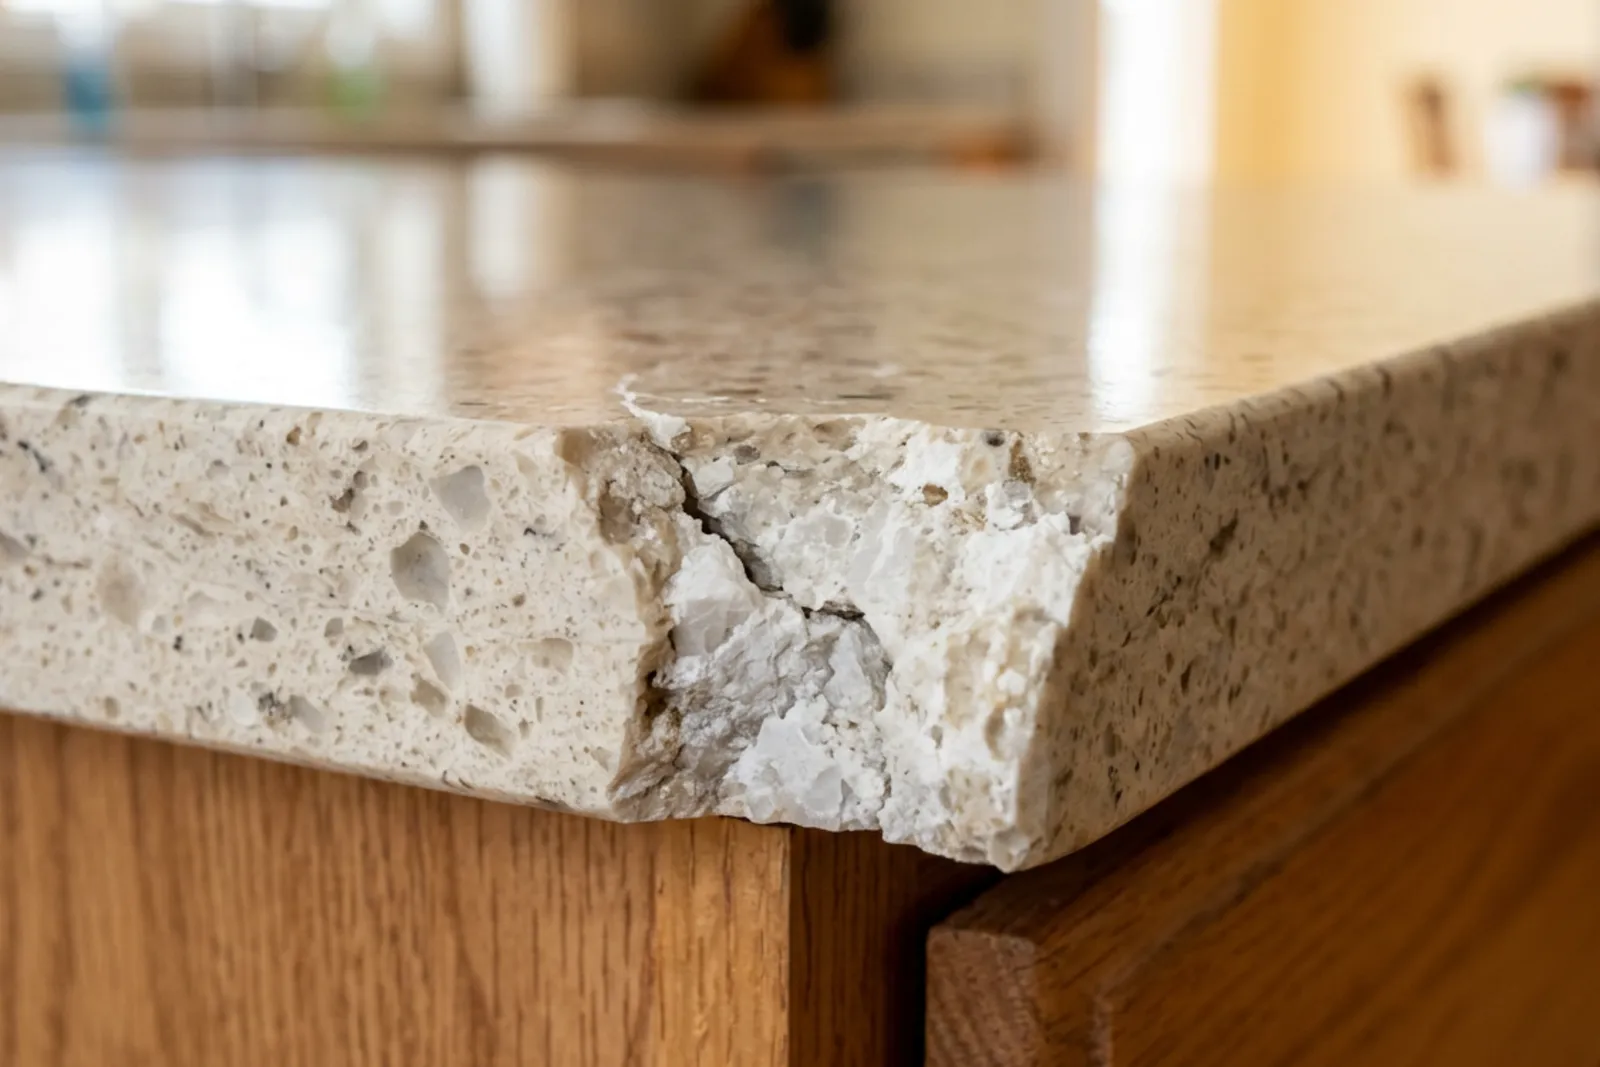
A chipped edge or a thin crack in a quartz countertop can be frustrating, especially when the rest of the surface still looks new. The first question is usually whether it can be repaired. Often, it can. The more useful question is whether that repair will be durable, reasonably discreet, and appropriate for the damage.
A shallow chip is very different from a crack running through the slab. Location matters, too: damage beside a sink opening deserves more caution than a small chip on a well-supported section.
Before reaching for adhesive, assess what happened and check the countertop manufacturer’s care and warranty guidance. A careful repair starts with knowing when to leave the surface alone.
Assess the Damage Before Choosing a Repair
Quartz countertops are engineered surfaces made with mineral particles, binders, and pigments. They are durable, but they can chip under a concentrated impact or crack when heat or stress exceeds what the material can tolerate.
Look at the damaged area under good lighting. Note its length, width, depth, and position. Photographs with a ruler beside the damage can help a fabricator assess the problem without relying on a description alone.
Small Chips and Surface Defects
A small, shallow chip may be suitable for a minor repair if the surrounding material is stable and the countertop is properly supported. Chips smaller than about 2 cm are sometimes repairable, but that measurement is not a guarantee that DIY repair is appropriate.
A chip that size on an exposed corner can still be difficult to rebuild. By contrast, a much smaller surface pit in a patterned area may be easier to disguise.
Check for loose fragments, sharp edges, or cracks extending outward. Do not pull away material that remains attached. If you find a detached piece, save it for a professional to inspect.
Cracks That Need More Caution
A hairline crack may look insignificant, but its narrow appearance does not reveal how deeply it extends. A crack running through the slab, continuing onto an edge, or opening under normal use needs professional assessment.
Cracks longer than roughly 5 cm are a sensible reason to contact a fabricator, rather than a strict dividing line between repairable and unrepairable damage. Shorter cracks can also be structural.
Damage near sink and cooktop cutouts deserves particular attention. These openings leave narrower sections of quartz that may be more vulnerable to stress. Multiple cracks, recurring repairs, or a crack that keeps growing can point to inadequate support, uneven cabinets, or movement beneath the slab.
Check Warranty Terms First
Before applying anything, review the countertop warranty and contact the installer or manufacturer if coverage may apply. An unauthorized adhesive or alteration can affect a claim.
Keep purchase records, installation documents, and photographs. Avoid filling the damage while waiting for advice, since a repair can make its original condition harder to evaluate.
Why Quartz Chips and Cracks
Understanding the cause helps prevent a repaired area, or another part of the countertop, from failing again.
Impact is a common cause of chips. A dropped pan, heavy bottle, or small hard object can concentrate force on a vulnerable spot. Exposed edges and corners are especially susceptible.
Heat is another concern. Quartz contains binders that can be damaged by high temperatures. Hot cookware placed directly on the surface can cause discoloration or thermal stress, sometimes resulting in cracking. Abrupt temperature changes, including extreme cold exposure, may also be a problem for some products. Follow the manufacturer’s limits rather than assuming quartz is heatproof.
Weight and support matter as well. Standing or sitting on a countertop puts loads on areas that may not be designed to carry them, particularly around overhangs and openings.
If the underlying cabinetry is uneven or moving, filling a crack will not correct the cause. A countertop fabricator may need to work with a cabinet maker to assess support and cabinet condition. Good cabinet design accounts for countertop weight, overhang support, and appliance openings before the slab is installed.
Choosing a Repair Material
For minor cosmetic damage, repair products may include epoxy, acrylic adhesive, or resin formulated for engineered stone. Some kits include pigments for color matching.
The right choice depends on the countertop, the damage, and the repair product’s instructions. Clear adhesive may suit a very fine crack or a less conspicuous area, but “clear” does not mean invisible. A transparent repair can catch light differently or look darker where it fills a void.
Color-matched adhesive may blend better, especially on an edge. Still, matching a solid white, gray, or black surface can be surprisingly difficult. Patterned quartz sometimes disguises a repair more effectively, although a filled area crossing a vein may remain noticeable.
Viscosity also matters. A thinner product may flow into a fine horizontal crack, while a thicker formulation is easier to control on a vertical edge.
Avoid choosing ordinary household super glue simply because it is available. Some professional stone repairs use specialized cyanoacrylate products, but general-purpose glue may be brittle, leave residue, or produce a poor cosmetic result. Use only a product approved for the intended repair and compatible with the countertop.
How to Approach a Minor DIY Quartz Repair
The following process is intended for a small, stable cosmetic defect. It is not a method for restoring the strength of a cracked slab. If the damage raises questions about support or movement, stop and get it assessed.
1. Confirm That the Repair Is Suitable
Read both the countertop manufacturer’s guidance and the repair product instructions before starting. Check whether the adhesive is intended for engineered quartz, whether it can be used on an edge, and how it must be finished.
Test compatibility in an inconspicuous location where permitted. A test may reveal discoloration or a finish reaction, though it cannot guarantee a perfect match in the damaged area.
Wear the protection specified by the product’s safety instructions and provide ventilation. Keep children and pets away from the work area.
2. Clean and Dry the Area
Remove dirt, grease, and cleaning residue with a cleaner approved for the countertop. Use a soft cloth and avoid flooding the damaged area.
Some repair systems call for a solvent, but do not assume acetone is safe for every quartz product or surrounding finish. Use it only when the relevant manufacturer guidance permits it. Protect nearby cabinetry and allow any approved solvent to evaporate completely.
The repair area needs to be dry before adhesive is applied. Moisture or residue can interfere with adhesion.
3. Mask the Surrounding Surface
Apply suitable masking tape around the defect to limit adhesive spread. Leave enough access to fill the damage without coating a broad area of intact quartz.
Masking helps contain the repair, but it does not protect against every stain or chemical reaction. It is still necessary to confirm product compatibility.
4. Mix and Apply the Adhesive Carefully
For a two-part product, measure and mix it exactly as directed. An incorrect ratio can prevent proper curing or weaken the repair.
Apply a controlled amount with the recommended applicator. Follow the product’s instructions on fill depth and layering. Some materials work best in thin applications; others require a different method.
Avoid spreading excess adhesive over the surrounding finish. A large raised patch is harder to finish and may make a small defect more noticeable.
5. Allow the Full Curing Time
Keep the area out of use until the adhesive has fully cured. This may take 24 hours or longer, depending on the formulation and conditions.
“Dry to the touch” is not necessarily fully cured. Water, cleaning products, pressure, or attempts to level the repair too soon can interfere with the result.
Follow the specified timing for tape removal as well. Some systems require masking to be removed before the adhesive hardens completely.
6. Finish Without Damaging the Quartz
Finishing is often the riskiest part of a DIY repair. Scraping or sanding can turn a small filled chip into a wider patch with a different sheen.
Use only the leveling method specified for the repair system and permitted by the countertop manufacturer. Blades can scratch the surface or cause injury if they slip. Sandpaper can dull the surrounding factory finish.
Do not dry-sand, grind, or polish the quartz itself. Abrading quartz can release hazardous respirable crystalline silica dust. If the repair cannot be leveled without working the stone surface, leave that stage to a qualified professional.
When Professional Repair Is the Better Choice
Professional assessment is worthwhile when the damage is extensive, highly visible, or potentially structural. Contact a fabricator for:
Cracks extending through the slab or continuing onto an edge.
Damage near sink or cooktop cutouts.
Multiple cracks, widening cracks, or repeated failure in one area.
Large edge chips, loose sections, or uncertain countertop support.
A professional can evaluate the cause, select a suitable adhesive, and judge whether the damaged area can be finished acceptably. Color matching and rebuilding an exposed edge require more skill than simply filling a void.
Ask what the repair is expected to accomplish. Will it mainly improve appearance? Is reinforcement needed? Will a visible line remain? A successful cosmetic repair does not necessarily restore the slab’s original strength.
Replacement may be appropriate if the damage is extensive, the slab is unstable, or a dependable repair is not feasible. Any support or installation problem should be corrected first. Otherwise, a replacement countertop may face the same stresses.
Set Realistic Expectations About Appearance
Even a well-executed repair may remain visible from certain angles or under strong lighting. Plain surfaces tend to reveal differences in color and sheen. Prominent edges are difficult because both the profile and finish must match.
Patterned areas may hide a repair better, but results vary. Adhesive can also age differently from the surrounding quartz.
A useful goal is a stable, smooth repair that looks acceptable during ordinary use. An invisible result is sometimes possible, but it should not be promised without assessing the actual damage.
Preventing Further Chips and Cracks
Everyday habits make a difference. Use a cutting board rather than cutting directly on quartz, and place hot cookware on suitable trivets. Check the manufacturer’s advice for countertop appliances that produce prolonged heat, such as slow cookers or electric griddles.
Keep heavy items away from vulnerable edges when possible. Do not stand or sit on the countertop, and avoid using it to support concentrated loads during household projects.
For cleaning, mild soap, water, and a soft cloth or nonabrasive sponge are usually appropriate. Wipe spills promptly, including acidic liquids, and rinse away cleaning residue. Quartz generally resists many everyday spills, but its binders and finish still need compatible care.
Avoid abrasive pads, paint remover, harsh chemicals, and bleach unless the countertop manufacturer specifically permits the product and method.
Fix the Cause Before Filling the Damage
A small, stable chip may be a reasonable DIY project with the right materials and careful preparation. A crack near an opening, a damaged edge, or a slab with recurring problems calls for a more cautious approach.
The best repair decision considers both appearance and stability. Check the warranty, identify any underlying stress, and be realistic about what adhesive can achieve. Filling a defect can improve the surface, but preventing movement, heat stress, and impact is what helps the countertop stay sound.